Top 10 Serverless Deployment Errors (and How to Fix Them)

You know what they say: successful deploys are all alike; every unsuccessful deploy is unsuccessful in its own way (ok, no one actually says that, except engineers who have read way too much Russian literature, ahem).
However, in the past few years we have witnessed some recurring deployment errors while helping customers on their serverless journeys, so I thought I'd share them and their solutions in hopes of making them a little less common—or at least helping others get unstuck faster.
1. Invalid CloudFormation state
The error:
The most common error I see our users encounter is when a deploy fails because a previous deploy was unsuccessful. I can relate to this one because I've encountered it myself many times! The state returned from AWS CloudFormation is usually UPDATE_ROLLBACK_FAILED or DELETE_FAILED, and the error will look something like this:
The CloudFormation stack is in an invalid state for preparation (DELETE_FAILED). The CloudFormation stack name is '<stack-name>--'. Please resolve the issue then attempt preparation again.
The cause:
This situation often arises when a deployed stack's subsequent deployment fails, along with the stack rollback or deletion. Deletes often fail if one of the resources to be deleted is protected, such as a non-empty S3 Bucket, or if it has a RetainResources parameter. Rollbacks may fail when expected files or resources are missing.
The solution:
Unfortunately, resolving this situation usually requires using the AWS Console. You can find a quick link to the CloudFormation console in the Deploy view of your stack:
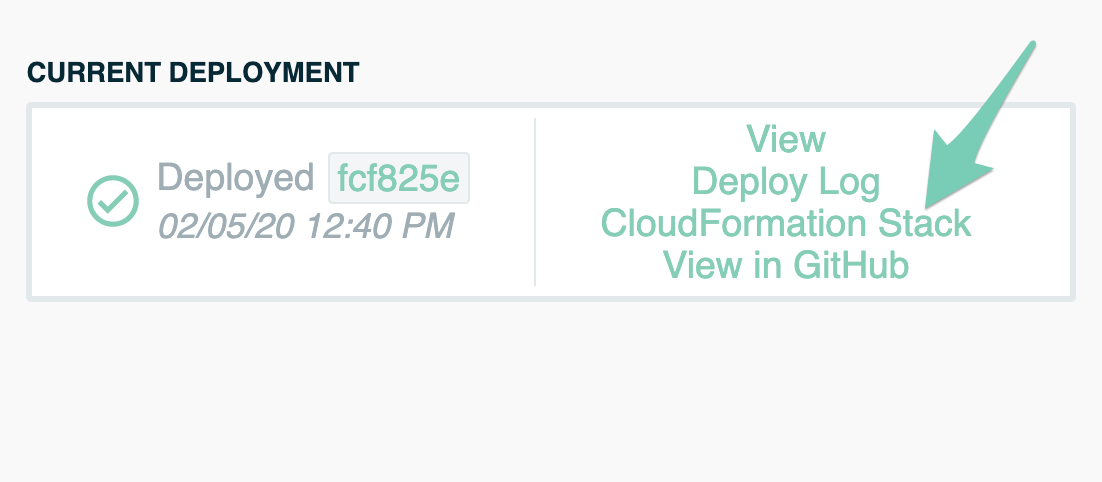
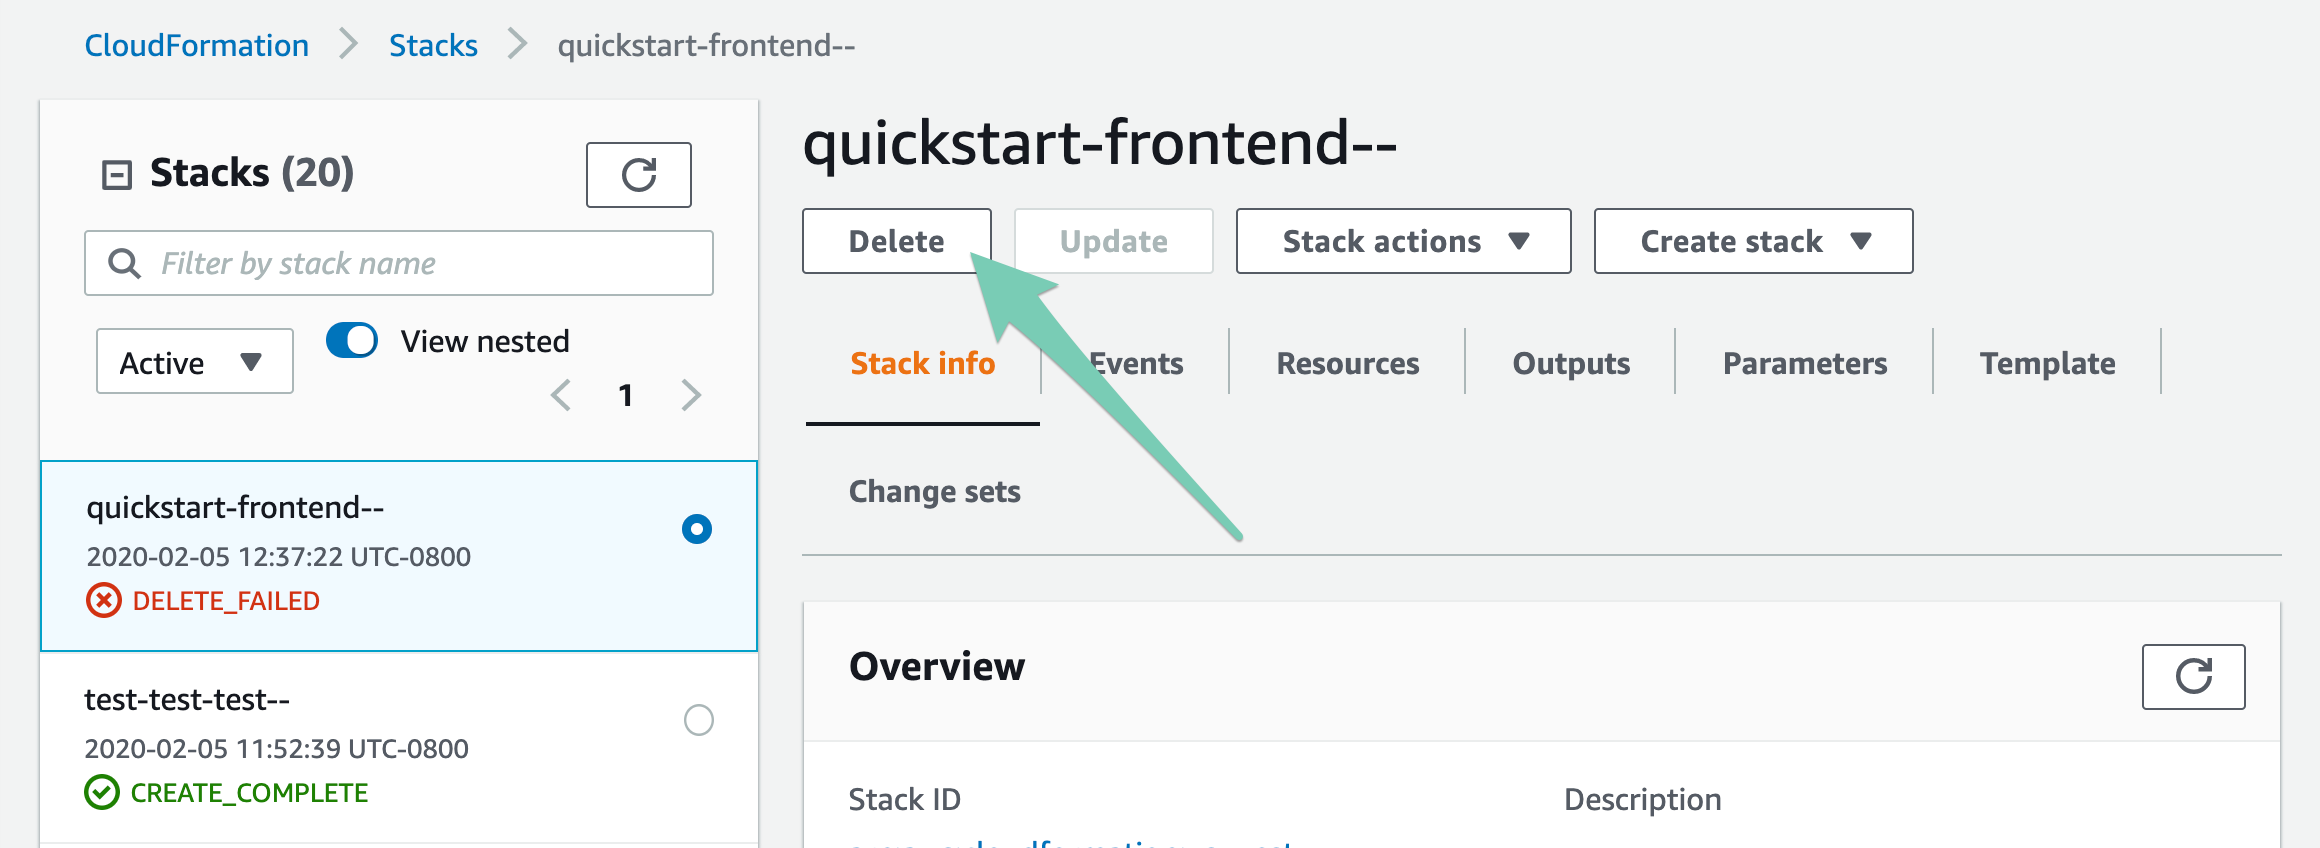
Alternatively, you can open the AWS Console, navigate to CloudFormation, and find the failed stack in your Stacks list:

In the case of a failed deletion, click into the stack, and press Delete:
The Delete modal will pop up, telling you the resources that are preventing deletion. Click to preserve them to complete the deletion:
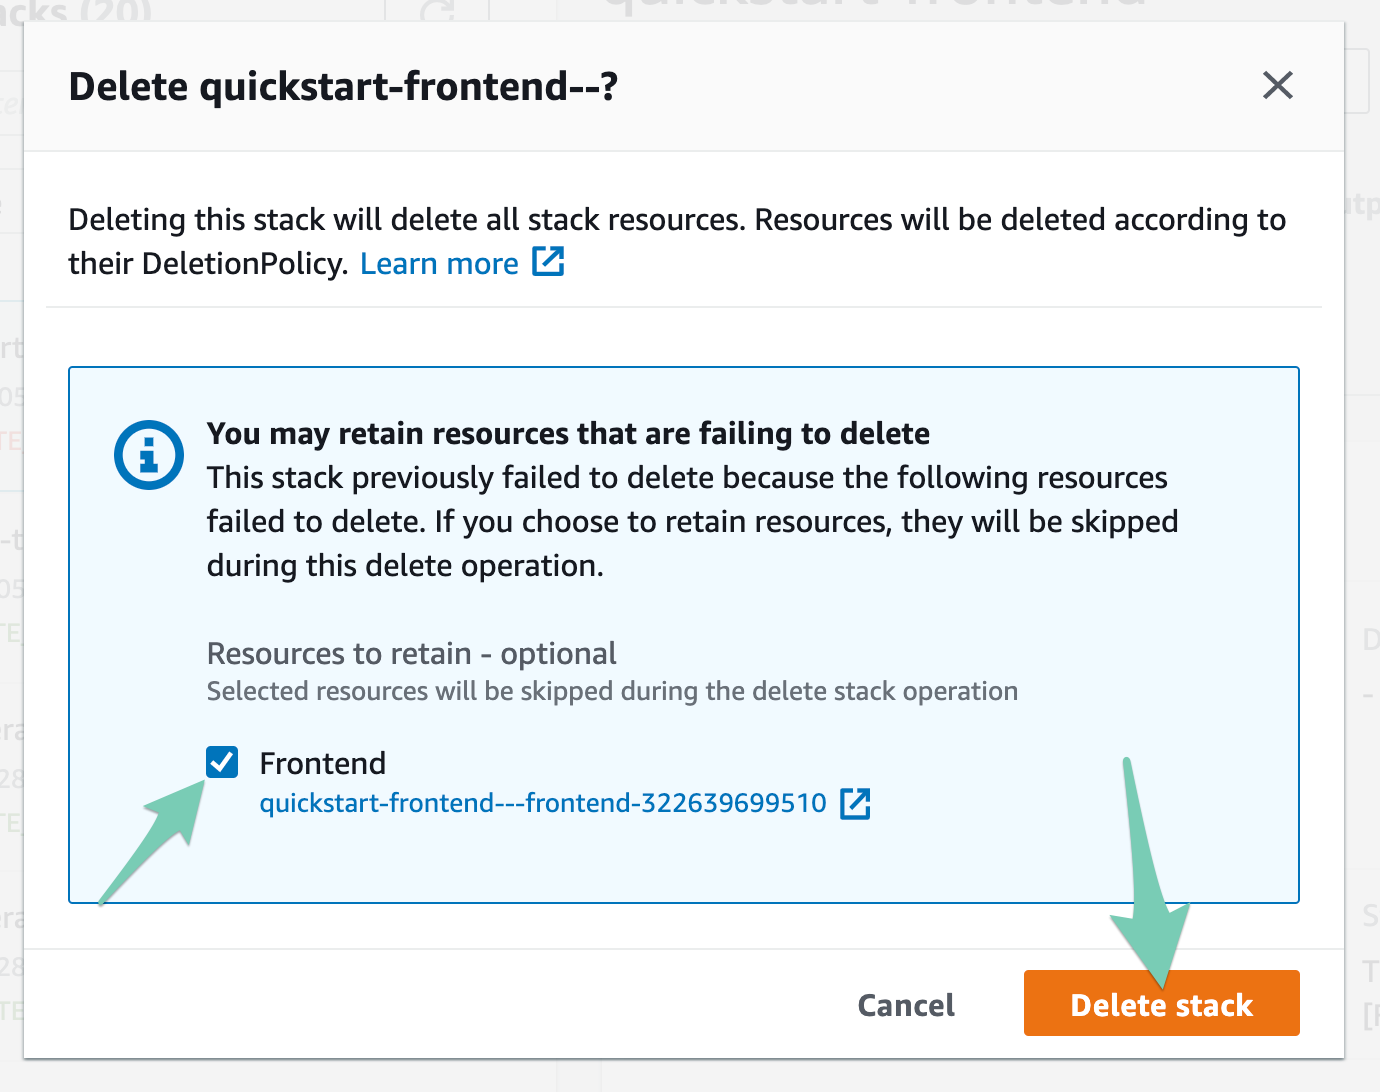
Be sure to take note of these resources before preserving them so you can delete them before or after deleting the stack—you don't want your S3 console to become a bucket graveyard!
In the case of a failed rollback, click into the stack, open the Stack actions drop-down, and select "Continue update rollback":
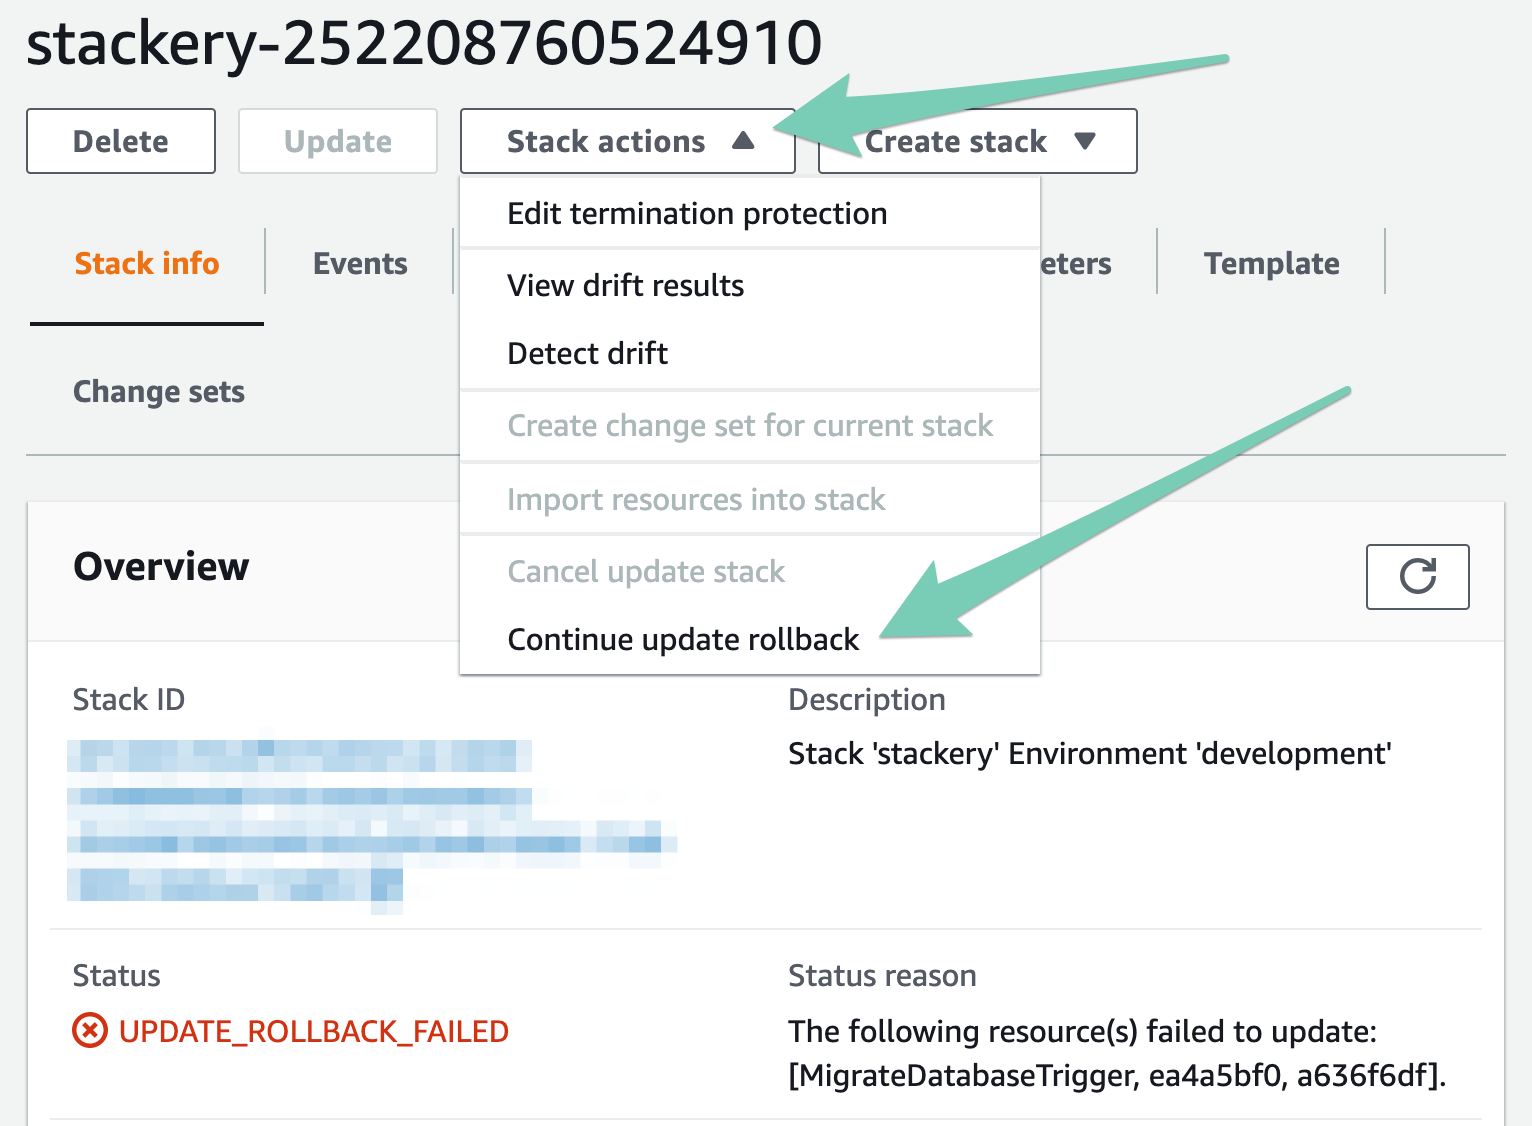
The rollback modal will pop up, giving you the option to skip the problematic resources. Select the resource(s) that failed and click Continue update rollback.
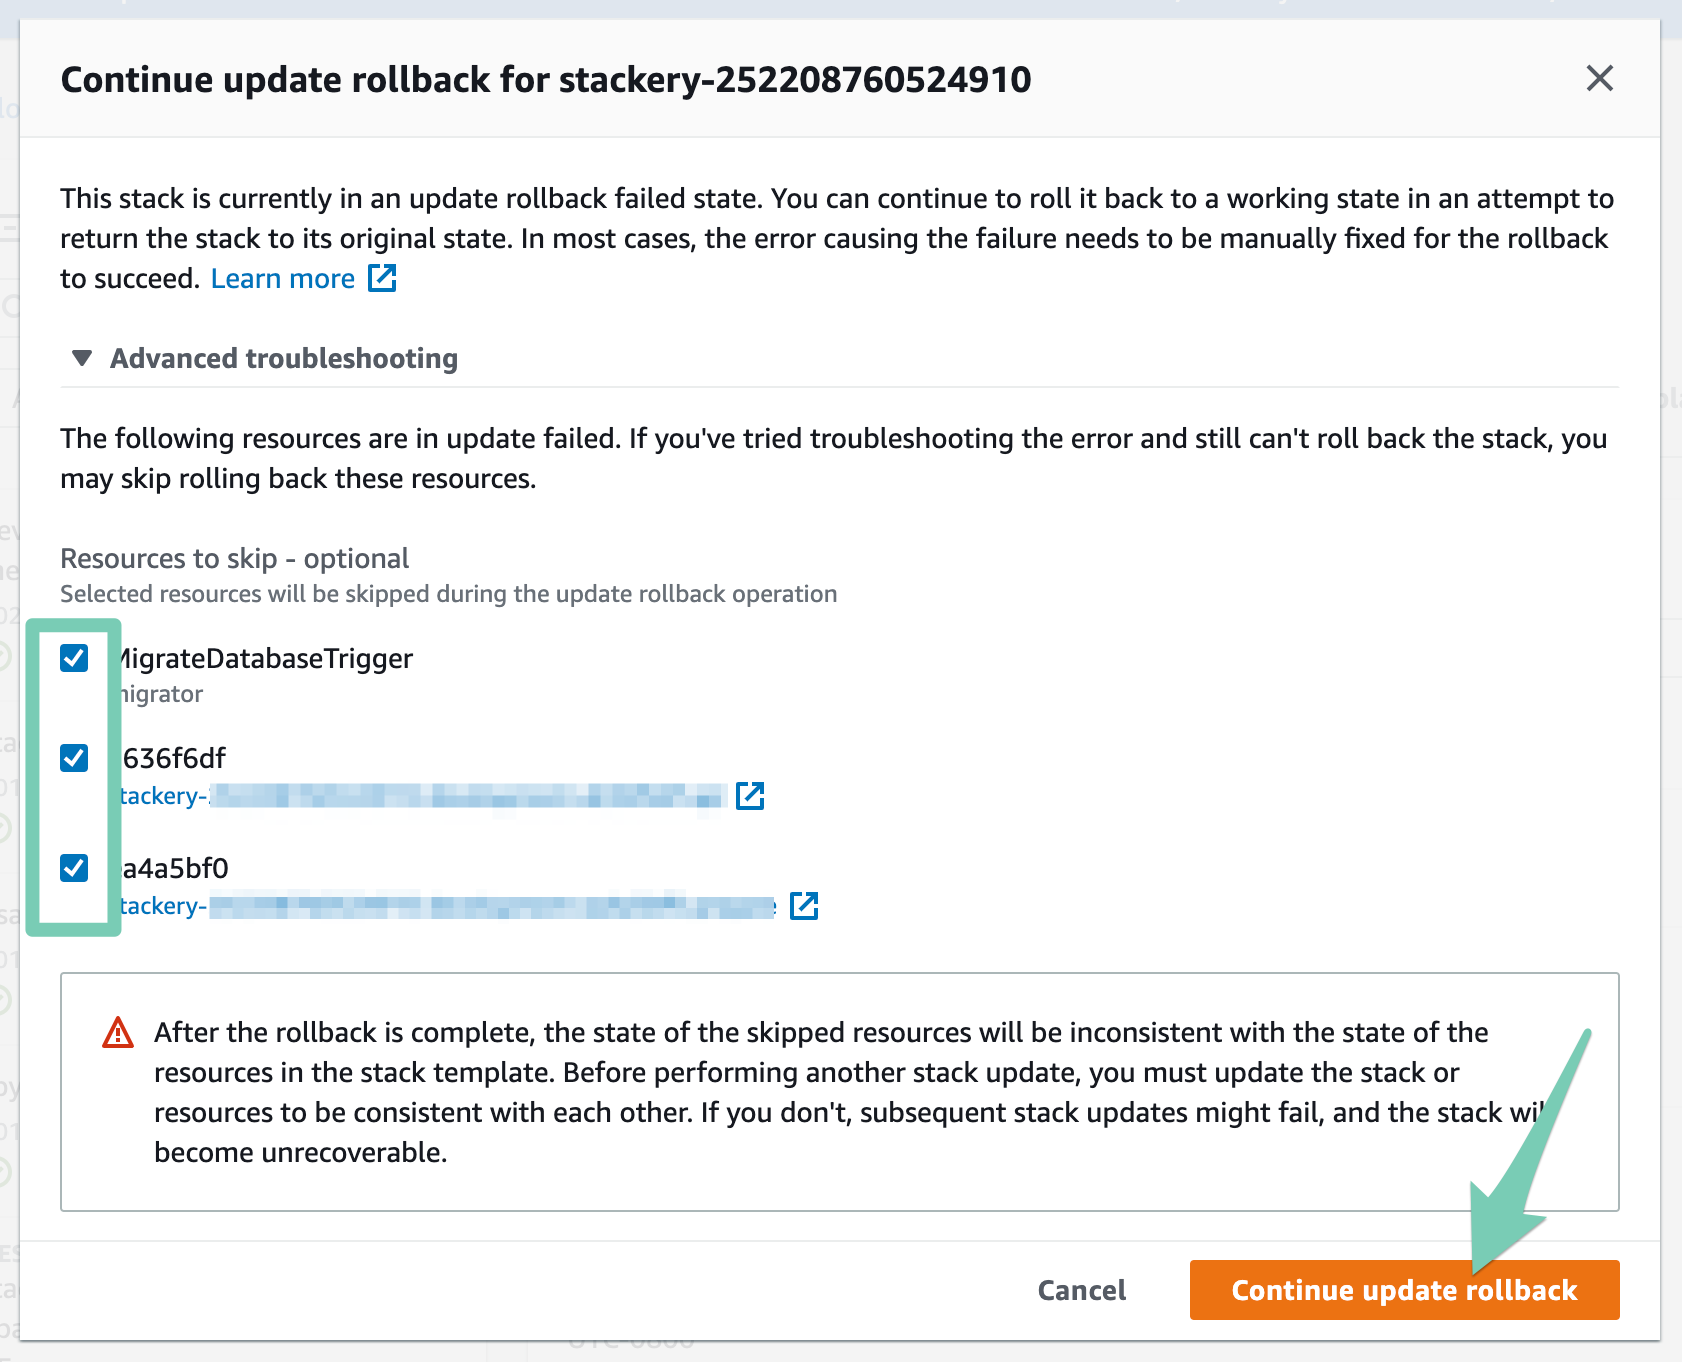
Once your stack has successfully deleted or rolled back, you can deploy it again from the Stackery Dashboard or CLI.
2. Unable to fetch parameters
The error:
ERROR: SubmitChangeset phase failed: Unable to create changeset: ValidationError: Unable to fetch parameters [/prod/api-key] from parameter store for this account. status code: 400, request id: 1b019342-61e5-483d-b4ce-ac445b13e351
The cause:
The second error on the most frequent error list is caused when an environment parameter is referenced but not defined in the deployment environment. This is usually the case when a function requires a parameter such as an API key, which is stored and available in one environment, but is then deployed into another environment which does not contain the key in its parameter store.
Note that AWS Systems Manager Parameter Store is region-based, which means the referenced parameter key must exist in the deploying region's parameter store.
The solution:
If you see this error, check that the needed parameter is available in the environment you're trying to deploy to, and add it if necessary.
Navigate to Environments, select the environment you're deploying to, and click Parameters in the sidebar. This will show you the list of key-value pairs that are saved in your environment's parameter store:
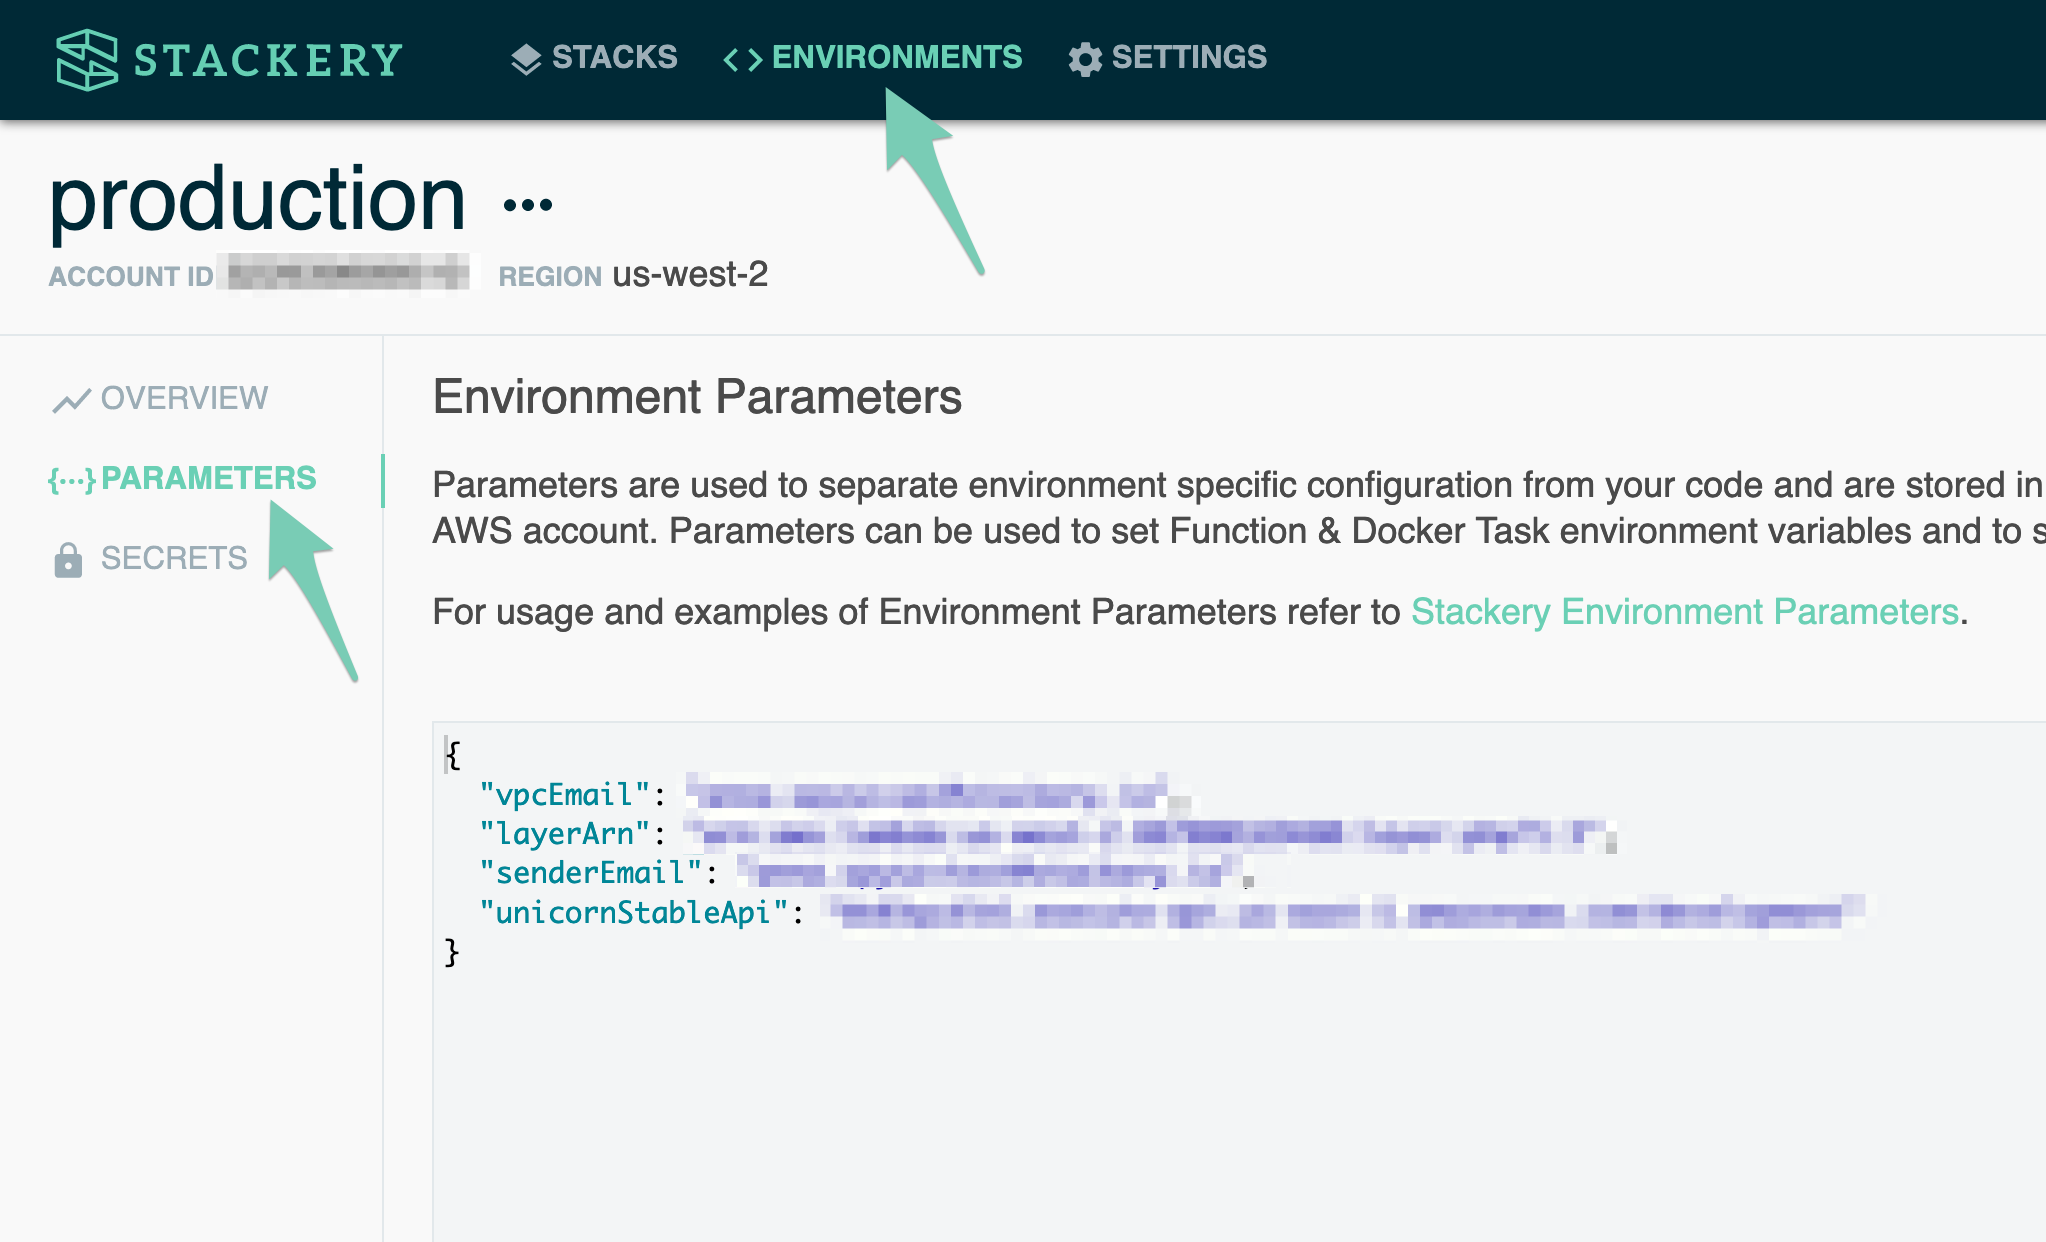
Then, make sure that environment variable is referenced correctly in the function:

3. API Gateway: No integration defined for method
The error:
Failed to provision resources for stack. A failure occurred for CloudFormation resource '<resource-name>' of type 'AWS::ApiGateway::Deployment' in stack '<stack-name>' with the following error: No integration defined for method (Service: AmazonApiGateway; Status Code: 400; Error Code: BadRequestException;)
The cause:
This error is caused when creating a API Gateway resource with a method (GET, PUT, POST, etc.) but not connecting that method to any other resource.
  brokenApi:
    Type: AWS::Serverless::Api
    Properties:
      ...
      DefinitionBody:
        swagger: '2.0'
        info: {}
        paths:
          /:
            get:
              responses: {}
The solution:
In the Stackery visual editor, be sure to link your API routes to functions.
If working directly with the template.yaml file, make sure each method includes x-amazon-apigateway-integration configurations.
  workingApi:
    Type: AWS::Serverless::Api
    Properties:
      ...
      DefinitionBody:
        swagger: '2.0'
        info: {}
        paths:
          /:
            get:
              x-amazon-apigateway-integration:
                httpMethod: GET
                type: aws_proxy
                uri: !Sub arn:${AWS::Partition}:apigateway:${AWS::Region}:lambda:path/2015-03-31/functions/${TsFunction.Arn}/invocations
              responses: {}
4. Codebuild deploy error when using npm local dependencies
The error:
When using local paths, you may get this error:
Running NodejsNpmBuilder:NpmInstall Error: NodejsNpmBuilder:NpmInstall - NPM Failed: npm ERR! code ENOLOCAL npm ERR! Could not install from "../<dir-name>" as it does not contain a package.json file.
The cause:
This is a known issue with the sam build command, which is unable to resolve dependencies outside the function source code directory.
The solution:
Users can address this with custom code in the deployment pre-build phase that copies sibling directories into the .stackery directory before builds are performed.
An alternative option could be to use custom lambda layers or a private npm package instead of requiring a local file.
5. Unable to deploy with a layer parameter
The error:
When deploying a function whose Lambda Layer is referenced as an environment parameter, AWS SAM CLI returns a message saying the function's layer ARN is invalid.
The cause:
There are a few possible causes, including:
- Referencing a layer that is in a different region than the deployed stack/environment
- Referencing a layer that hasn't granted layer-permissions to the environment's linked account
- Hitting a known AWS SAM CLI issue
The solution:
In the case of the first two issues, check the region and permissions of the layer and adjust if necessary.
In the case of the latter cause, you can either switch to the legacy deployment strategy for that stack, or add this deploy hook script.
6. AWS “Profile Not Found” error
The error:
A CodeBuild deploy fails with the error Profile Not Found.
The cause:
This will happen if you have an aws-profile environment parameter in the .stackery.config.yaml file in your root directory. The Stackery CLI will use that root .stackery.config.yaml file within CodeBuild and won't have access to view the ~/.aws/credentials file on your local computer.
The solution:
To fix this, move that environment parameter to the .stackery.config file in your function directory.
7. CloudFormation cannot update a stack with custom-named resource request
The error:
Failed To Deploy Deployment
Failed to provision resources for stack. A failure occured for CloudFormation resource '<resource-name>' of type 'AWS::Batch::ComputeEnvironment' in stack '<stack-name>' with the following error: CloudFormation cannot update a stack when a custom-named resource requires replacing. Rename <stack-name>-<resource-name> and update the stack again.
The cause:
AWS CloudFormation doesn't replace a resource that has a custom name unless that custom name is changed to a different name.
The solution:
To prevent a stack failure and avoid the error message, change any resources with custom names to use different names before you update a stack.
If you omit the identifier, CloudFormation will generate it automatically.
Read more:
8. Stalled deployment on “Custom::ResourceName” resource
The error:
In the AWS Console, you can see that your deployment is stalling on a “Custom::ResourceName” resource. You don't remember adding any custom resources.
The cause:
When you're configuring a function, if Trigger on First Deploy (or First/Every) is enabled, Stackery adds a Custom Resource that triggers the function on the first, or every deployment (e.g. Custom::FunctionDeployTrigger). Function handlers with these properties enabled must be written in a way that responds to this custom resource with an invoke status of SUCCESS or FAILED.
The solution:
Adding a handler can be done using cfn-custom-resource and an example can be found in the React SPA tutorial.
The custom resource waits for a response back from the function it's triggering to determine whether or not to proceed with the stack deployment. If a signal is not received by the custom resource, it retries up to three times and can last ~1 hour for each attempt. However, if this long wait occurs, you can manually send a signal with the following CURL statement that sends the signal to the custom resource to proceed with the deployment:
curl -X PUT '{RESPONSE_URL}' -H 'Content-Type:' -d '{"Status":"SUCCESS","Reason":"Manual Success","PhysicalResourceId":"resource","RequestId":"{REQUEST_ID}","LogicalResourceId":"{LOGICAL_RESOURCE_ID}","StackId":"{STACK_ID}"}'
9. No password for your database
The error:
Failed to provision resources for stack. A failure occurred for CloudFormation resource 'Database' of type 'AWS::RDS::DBCluster' in stack '<stack-name>' with the following error: Property MasterUserPassword cannot be empty.
The cause:
You wouldn't give just any person off the street access to your user data—so why do the equivalent of that and try to deploy an unprotected database? Luckily, AWS protects you from accidentally doing so by throwing the above error if you try to deploy an RDS or Aurora Serverless Cluster without a root password set.
The solution:
Put a password on it! The easiest (and not recommended way) is to type the password in the password field in the visual editor:
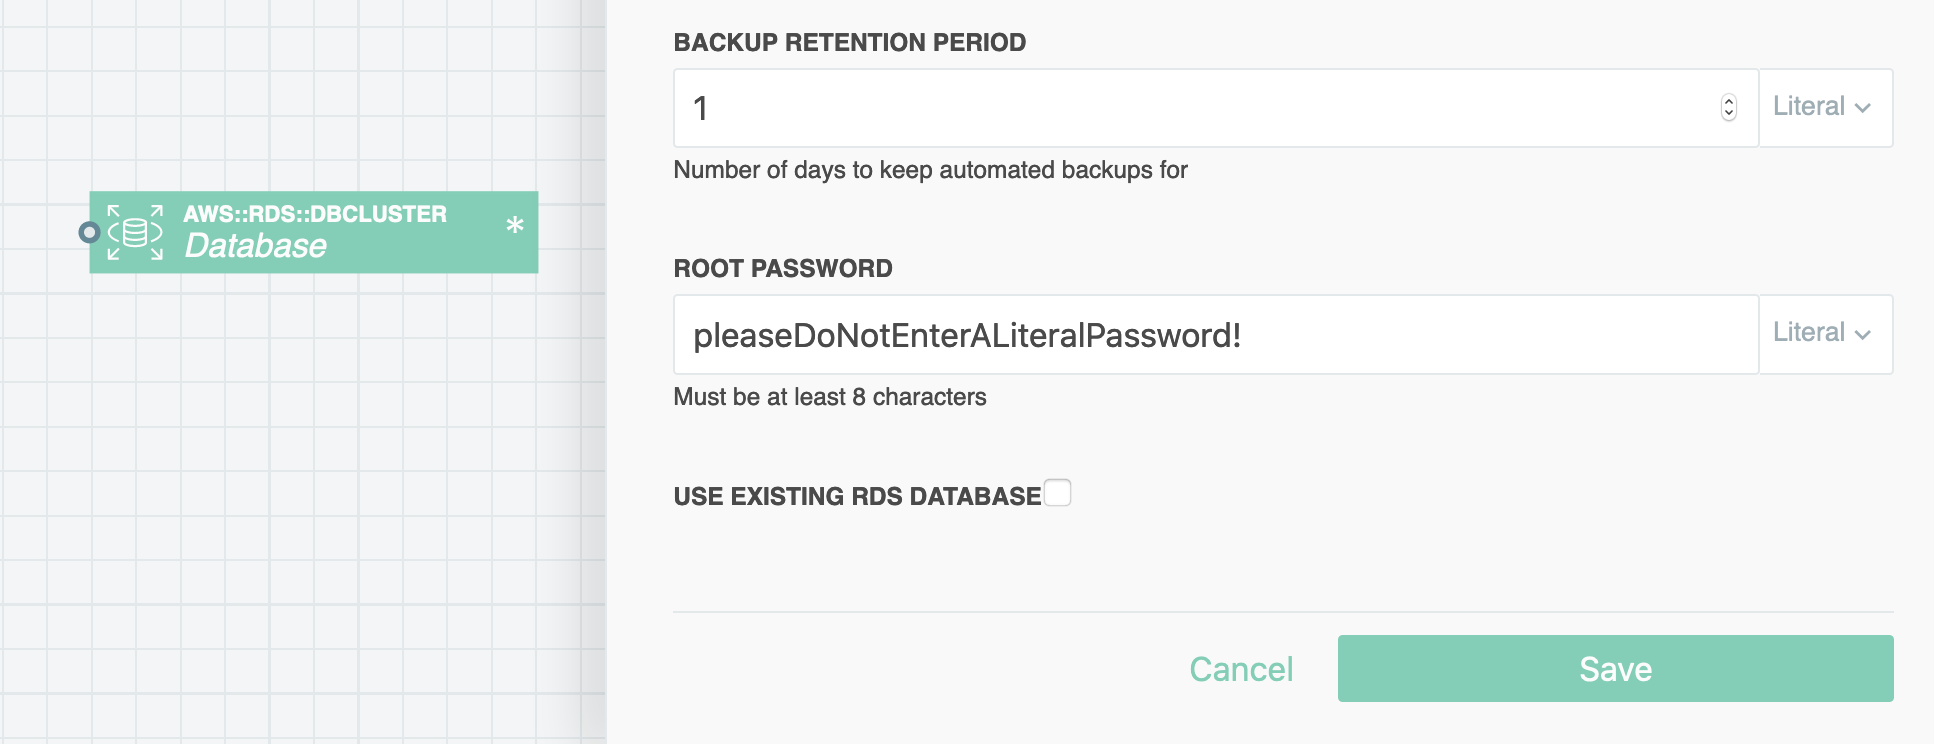
Please don't do this! Your password would be stored in plain text and committed with your repo, and that's as good as making it public.
Instead, use the AWS Secrets Manager! The Secrets resource in Stackery gives your functions access to secrets stored in the Secrets Manager, which can be dynamically referenced in the password field of your database.
So if you were storing your database password in the Secrets Manager for an environment called production, your reference pattern would look something like this:
{{ "{{resolve:secretsmanager:/production/RDSpassword:SecretString:password" }}}}
In your template.yaml, you would see:
  Database:
    Type: AWS::RDS::DBCluster
    Properties:
      BackupRetentionPeriod: 1
      DBSubnetGroupName: !Ref DatabaseSubnetGroup
      Engine: aurora
      EngineMode: serverless
      MasterUsername: root
      MasterUserPassword: {{ "'{{resolve:secretsmanager:/production/RDSpassword:SecretString:password" }}}}'
You can view the AWS docs on dynamically referencing Secrets Manager as well as our doc on how to fetch Secrets Manager secrets for examples of referencing secrets in your resources and functions.
10. No default VPC found when deploying an RDS
The error:
If you're deploying a stack that contains a database, you may see a not-very-helpful error in the Stackery Dashboard that looks like this:
COMMAND_EXECUTION_ERROR: Error while executing command: stackery deploy --base-dir . -n $STACK_NAME -e $ENVIRONMENT_NAME --template-path "$TEMPLATE_PATH" --deployment-key $DEPLOYMENT_KEY --prepare-only. Reason: exit status 1
If you click into the CodeBuild deploy log, you'll find the proper culprit.
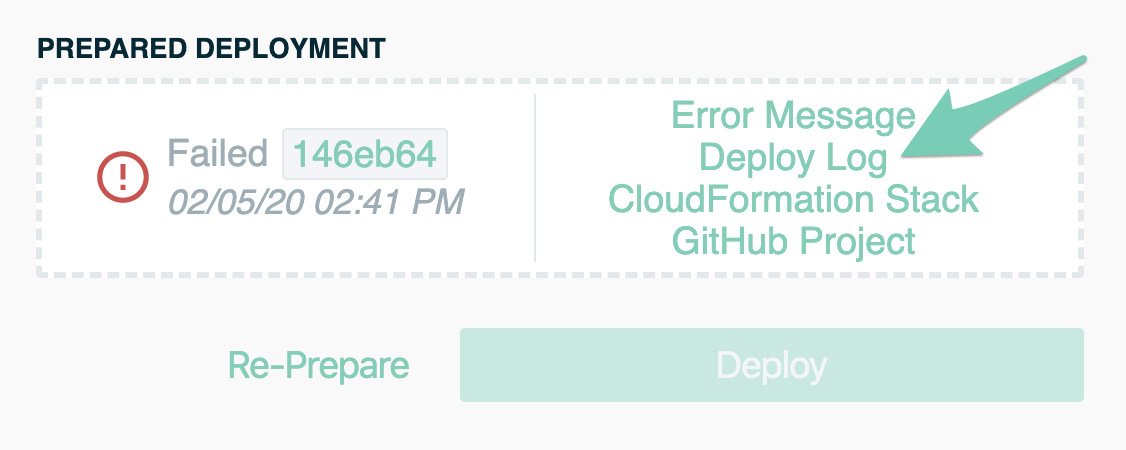
It may be hidden, but towards the end of the logs you'll see this:
Error: no default VPC for parameter
The cause:
Just like your database needs a password, it also needs to be in a VPC for security. While you can easily configure a VPC in Stackery, if you create a stack without one that contains an RDS and deploy it to CloudFormation, it will put that database into your default VPC. If you don't have a default VPC already, you'll get the above error.
The solution:
There are two ways to solve this: either put your RDS in a VPC that you configure in Stackery, or create a default VPC in the AWS console.
To put your database in a VPC, just drag that resource in like so:
If you'd rather configure a default VPC, navigate to the VPC section AWS Console, and select Your VPCs from the side nav, press the Actions button and select Create Default VPC (be sure you are in the region you wish to deploy to):
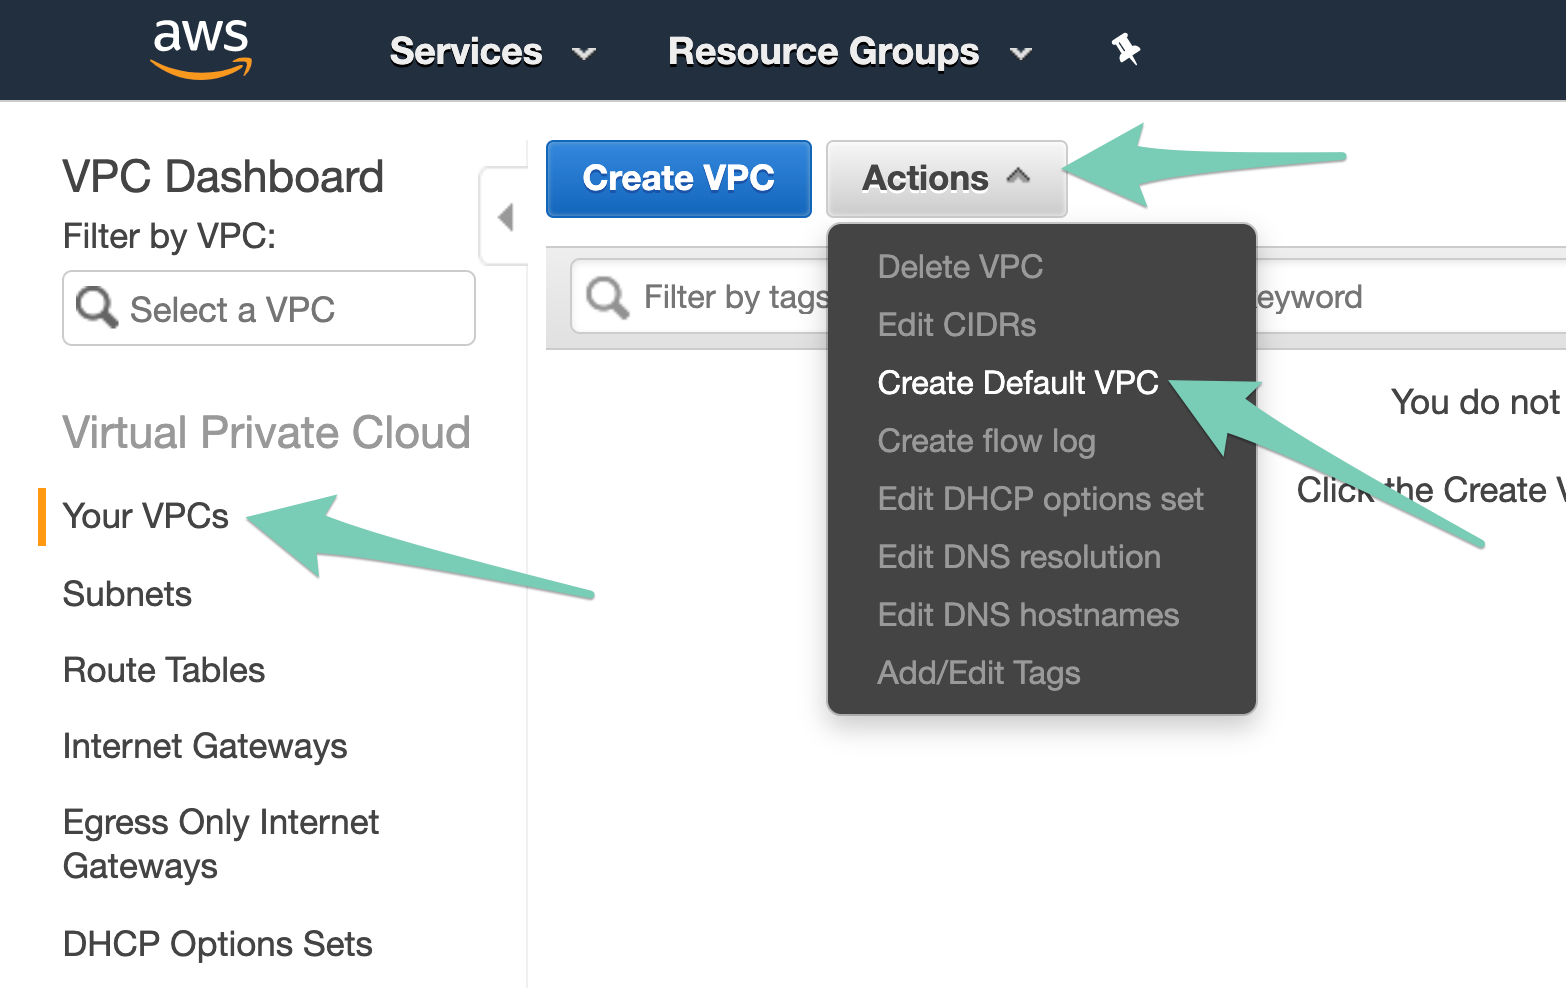
Hit Create on the next page, and in a few moments your default VPC will be created. When you re-prepare your stack, it should succeed this time.
Errors? You've got this!
Should you encounter a different deployment error without an obvious answer, try the CloudFormation troubleshooting docs to see if you can find a solution there.
If you're still stumped and aren't yet using Stackery, try us out! Biased as I may be, one of Stackery's most compelling features is the advanced serverless support we offer software development and delivery teams. Once you have an account, feel free to get in touch with us via the in-app chat or by emailing support@stackery.io, and we'll do our best to help you out!

